GrowthForms Workshop
GrowthForms: Building a TypeForm Competitor
Section titled “GrowthForms: Building a TypeForm Competitor”Saturday 17th January 2026 | 10am UK
Build a complete form builder from scratch using spec-driven development. No drag-and-drop interfaces. No templates. Just Claude Code and a structured approach that scales.
The Story So Far
Section titled “The Story So Far”GrowthPath Consulting Ltd has been using TypeForm to collect customer feedback and capture leads. But Hodl McDougall (the Honey Badger CEO) is fed up with the subscription costs.
“Three hundred quid a year for what’s basically a form connected to a database?” Hodl grumbled during the Monday stand-up. “We’ve been learning Claude Code for weeks now. Surely we can build our own?”
Flora McCombie needs the customer details form for lead capture. Angus Chalmers wants a feedback form for service improvement. The challenge is set: build GrowthForms in a single session.
What We’re Building
Section titled “What We’re Building”
GrowthForms - A TypeForm-style form builder with:
- Form creation - Build multi-question forms without code
- Multiple form types - Customer details, feedback, surveys
- Local storage - All data persists in the browser
- Clean UI - ShadCN components for a polished look
Tech Stack
Section titled “Tech Stack”| Technology | Purpose |
|---|---|
| React + Vite | Fast development, hot reload |
| ShadCN/UI | Pre-built accessible components |
| localStorage | Browser-based persistence |
| TypeScript | Type safety and autocompletion |
The Spec-Driven Approach
Section titled “The Spec-Driven Approach”Instead of drag-and-drop form building, we use Claude Code to build forms from specifications. This approach:
- Scales better - Specs can describe complex forms that would take ages to configure manually
- Is reproducible - Same spec, same result, every time
- Teaches transferable skills - The spec-driven workflow applies to any project
The Workflow
Section titled “The Workflow”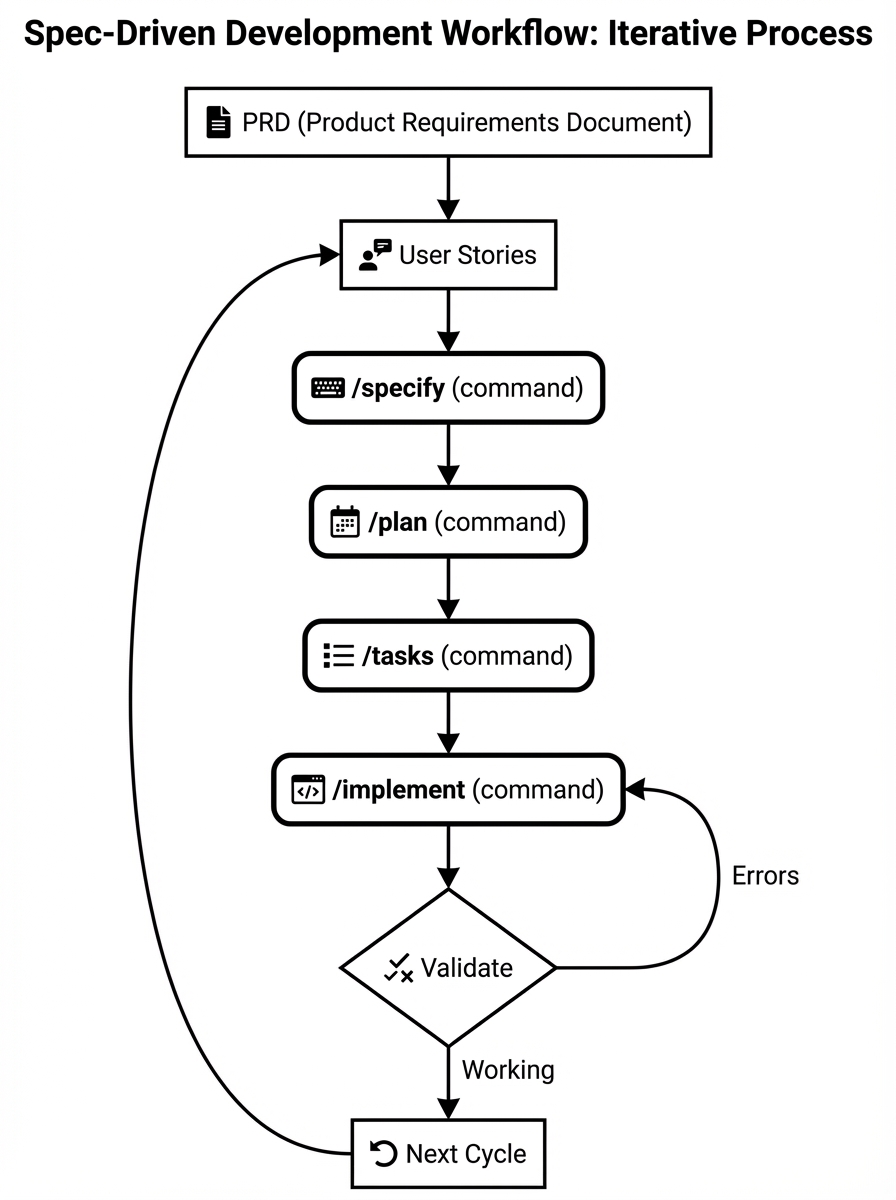
Each cycle follows the same pattern:
- PRD - The north star document describing the overall product
- User Story - A specific feature we’re building this cycle
- /specify - Generate a detailed specification from the user story
- /plan - Create an implementation plan from the spec
- /tasks - Break the plan into actionable tasks
- /implement - Execute the tasks with Claude Code
- Validate - Test the result, fix any issues
Setting Up Speckit
Section titled “Setting Up Speckit”Speckit is the tool that powers our spec-driven workflow. It provides slash commands that integrate with Claude Code.
Prerequisites
Section titled “Prerequisites”- Python 3.11 or later
- Git installed
- uv package manager
- Claude Code installed
Installation
Section titled “Installation”Install speckit globally using uv:
uv tool install specify-cli --from git+https://github.com/github/spec-kit.gitInitialise Your Project
Section titled “Initialise Your Project”Navigate to where you want to create GrowthForms and run:
specify init growthforms --ai claudeThis creates the project structure with speckit configuration.
If you already have a folder, use --here:
cd growthformsspecify init . --here --ai claudeVerify Installation
Section titled “Verify Installation”Check everything is working:
specify checkAvailable Commands
Section titled “Available Commands”Once initialised, these slash commands are available in Claude Code:
| Command | Purpose |
|---|---|
/speckit.constitution | Set up project principles (British English, TDD, etc.) |
/speckit.specify | Generate detailed spec from user story |
/speckit.plan | Create implementation plan from spec |
/speckit.tasks | Break plan into actionable task list |
/speckit.implement | Execute all tasks |
/speckit.clarify | Refine unclear requirements |
/speckit.analyze | Validate consistency across artifacts |
Architecture Overview
Section titled “Architecture Overview”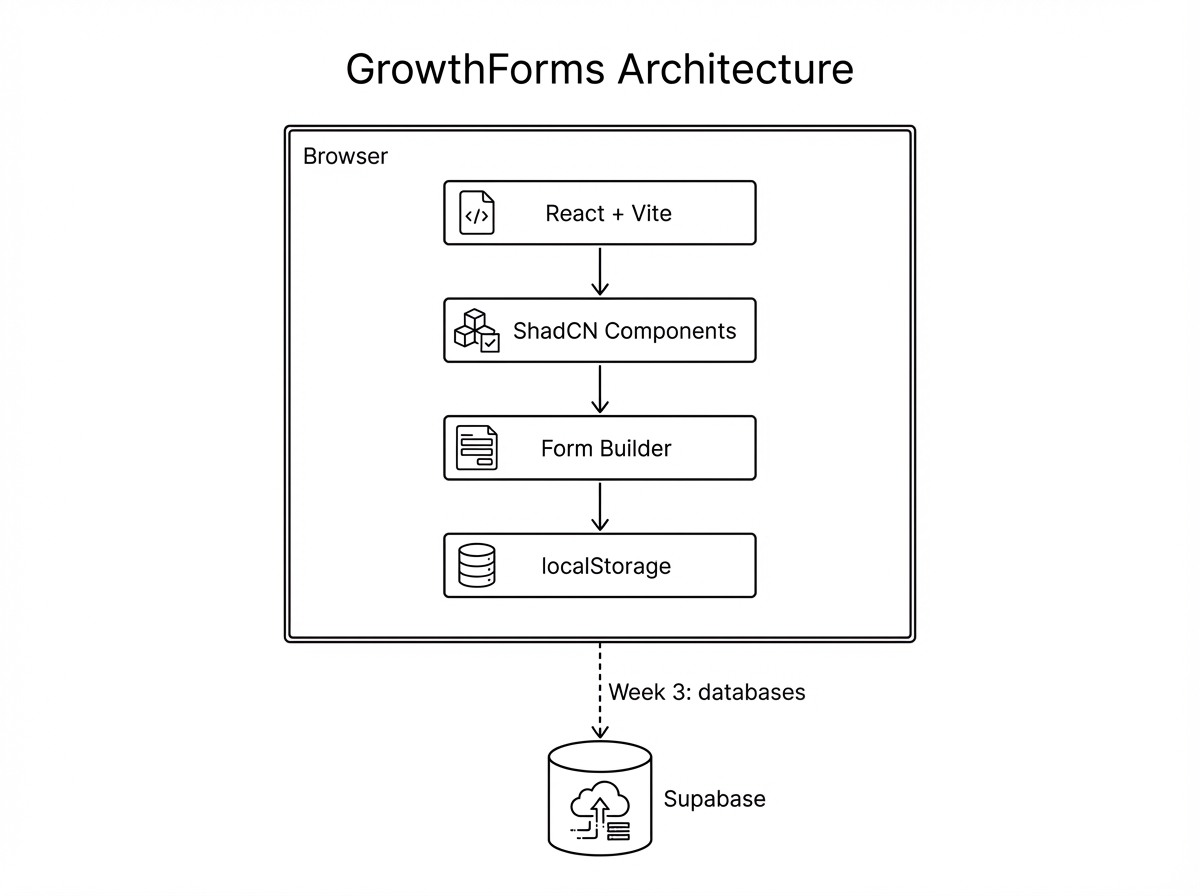
Today’s build is entirely client-side. All form data lives in localStorage. In Week 3, we’ll add Supabase for proper persistence and multi-user support.
Five Key Techniques
Section titled “Five Key Techniques”Throughout this workshop, you’ll see five techniques that make spec-driven development powerful:
1. PRD-First Development
Section titled “1. PRD-First Development”Create a north star document for the project. Every feature references back to the PRD. When in doubt, ask: “Based on the PRD, what should we build next?“
2. Constitution File
Section titled “2. Constitution File”A constitution encodes your project’s principles:
- British English (colour, organisation)
- Never use em dashes
- Vertical slice development
- Always use TDD
These rules persist across sessions and keep Claude Code consistent.
3. CLAUDE.md for Technical Requirements
Section titled “3. CLAUDE.md for Technical Requirements”The CLAUDE.md file tells Claude Code about:
- Tech stack and versions
- Project structure
- Commands to run
- Reference docs for specific task types
4. Context Reset
Section titled “4. Context Reset”After planning, output a structured plan document. Clear context before execution. Feed only the plan into the implementation phase. This prevents confusion and keeps Claude Code focused.
5. System Evolution
Section titled “5. System Evolution”Every bug is an opportunity to strengthen the system. Don’t just fix the bug - update rules, commands, or reference docs to prevent it recurring.
The PRD: Our North Star
Section titled “The PRD: Our North Star”Before we write any code, we need a Product Requirements Document. This is the “north star” that guides every decision.
📄 View the full PRD on GitHub →
The PRD covers:
- Problem statement (why we’re building this)
- User personas (Flora and Angus)
- Functional requirements
- Technical stack
- Success criteria
Cycle 1: Infrastructure Setup
Section titled “Cycle 1: Infrastructure Setup”Goal: Set up React + Vite + ShadCN + localStorage foundation
User Story
Section titled “User Story”As a developer, I want a working React app with ShadCN components and localStorage persistence so I can build forms on top of it.
What We’ll Build
Section titled “What We’ll Build”- Vite project with React and TypeScript
- ShadCN/UI component library installed
- Basic layout with header and sidebar
- localStorage helper functions
Discussion Points During Execution
Section titled “Discussion Points During Execution”Why Vite over Create React App?
Vite is significantly faster for development. Hot module replacement is nearly instant, and the build process is optimised for modern browsers. Create React App has been deprecated in favour of frameworks like Next.js, but for a client-side app like this, Vite is the sweet spot.
Why ShadCN over other component libraries?
ShadCN isn’t a traditional component library - it’s a collection of components you copy into your project. This means:
- Full control over the code
- No version conflicts
- Easy customisation
- Smaller bundle size (only include what you use)
localStorage considerations
localStorage is synchronous and blocks the main thread. For our use case (small amounts of form data), this is fine. For larger applications, you’d consider IndexedDB or a proper database.
Cycle 2: Navigation System
Section titled “Cycle 2: Navigation System”Goal: Sidebar with dropdown listing saved forms
User Story
Section titled “User Story”As a user, I want to see all my forms in a sidebar dropdown so I can switch between them easily.
What We’ll Build
Section titled “What We’ll Build”- Collapsible sidebar component
- Form list fetched from localStorage
- Create new form button
- Active form highlighting
Form List Architecture
Section titled “Form List Architecture”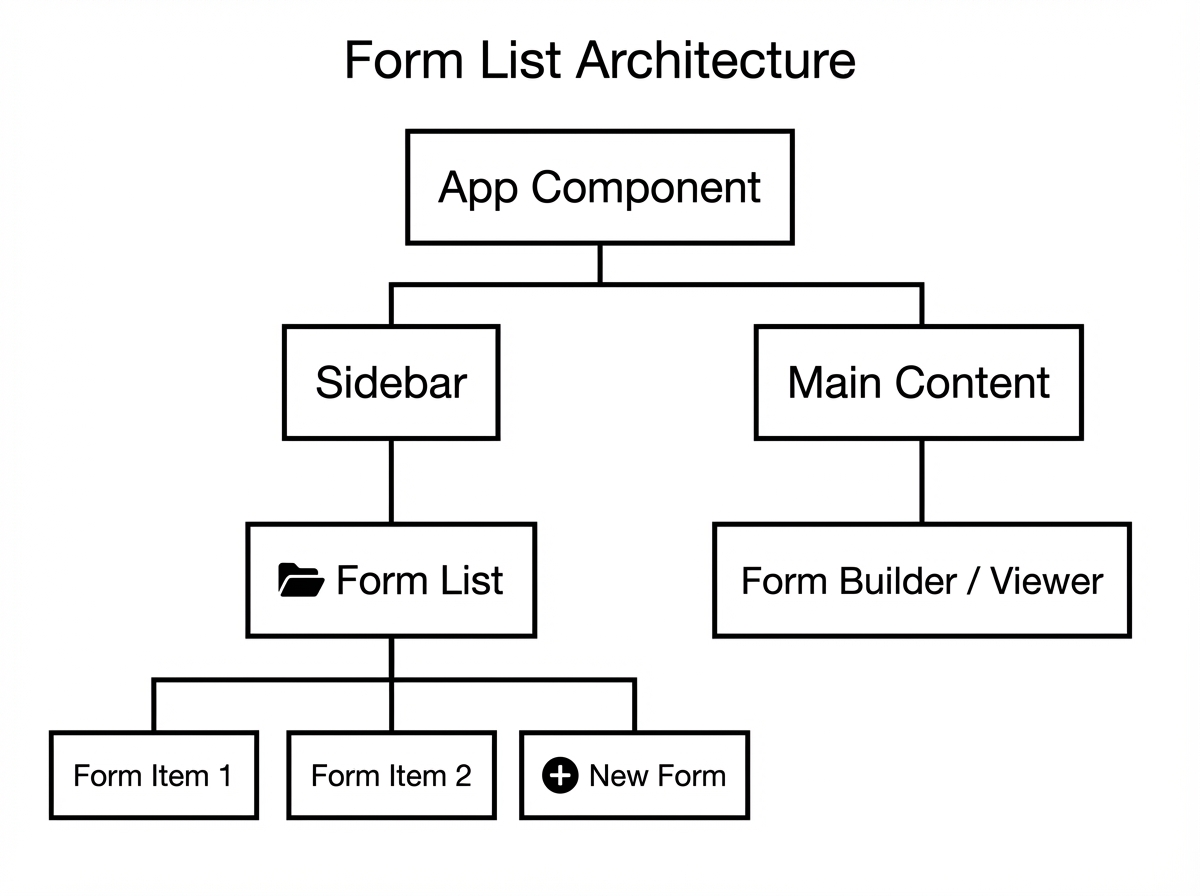
Discussion Points During Execution
Section titled “Discussion Points During Execution”Component composition in React
We’re building small, focused components that compose together. The sidebar doesn’t know about forms - it just renders what it’s given. The form list doesn’t know about the sidebar - it just displays items. This separation makes testing easier and components more reusable.
State management decisions
For a small app like this, React’s built-in useState and useContext are sufficient. Redux or Zustand would be overkill. The rule: start simple, add complexity only when pain points emerge.
Accessibility in navigation
ShadCN components come with ARIA labels and keyboard navigation built in. The dropdown is accessible by default - you can navigate with Tab and Arrow keys, and screen readers announce the state correctly.
Cycle 3: Customer Details Form
Section titled “Cycle 3: Customer Details Form”Goal: End-to-end form with name, email, phone, company fields
User Story
Section titled “User Story”As Flora (Customer Success), I want to create a customer details form that collects name, email, phone, and company information so I can capture leads for GrowthPath.
What We’ll Build
Section titled “What We’ll Build”Flora’s lead capture form with:
- Full name field (required)
- Email address field (required, validated)
- Phone number field (optional)
- Company name field (optional)
- Submit button with loading state
- Success confirmation
Form Flow
Section titled “Form Flow”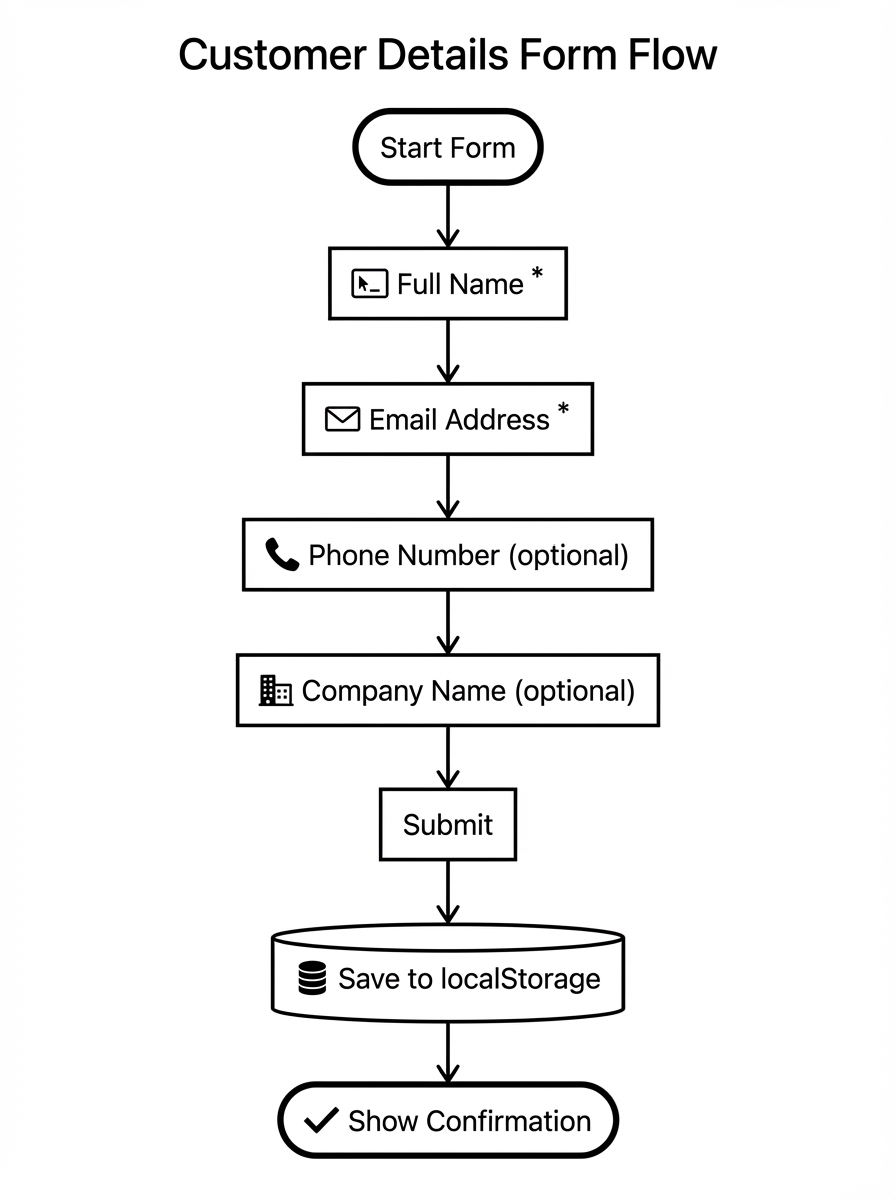
Discussion Points During Execution
Section titled “Discussion Points During Execution”Form validation approaches
There are several ways to validate forms in React:
- Native HTML5 validation - Built into browsers, limited customisation
- Controlled components with manual validation - Full control, more code
- Libraries like React Hook Form or Formik - Powerful but adds dependencies
For this workshop, we’ll use controlled components with ShadCN’s form components, which provide a good balance of control and convenience.
Email validation regex
The “correct” email regex is notoriously complex. For practical purposes, checking for an @ symbol and a dot in the domain is usually sufficient. The best validation is sending a confirmation email.
UX for optional fields
Marking required fields with asterisks is common but not always clear. We’ll label optional fields explicitly - “(optional)” - which research shows improves completion rates.
Cycle 4: Feedback Form
Section titled “Cycle 4: Feedback Form”Goal: End-to-end form with rating, comments, NPS score
User Story
Section titled “User Story”As Angus (Operations), I want to create a feedback form with star rating, comments, and NPS score so I can measure customer satisfaction with GrowthPath’s services.
What We’ll Build
Section titled “What We’ll Build”Angus’s service feedback form with:
- Star rating (1-5, required)
- Comments text area (optional)
- NPS score (0-10, required)
- Submit with validation
- Thank you message
Feedback Form Flow
Section titled “Feedback Form Flow”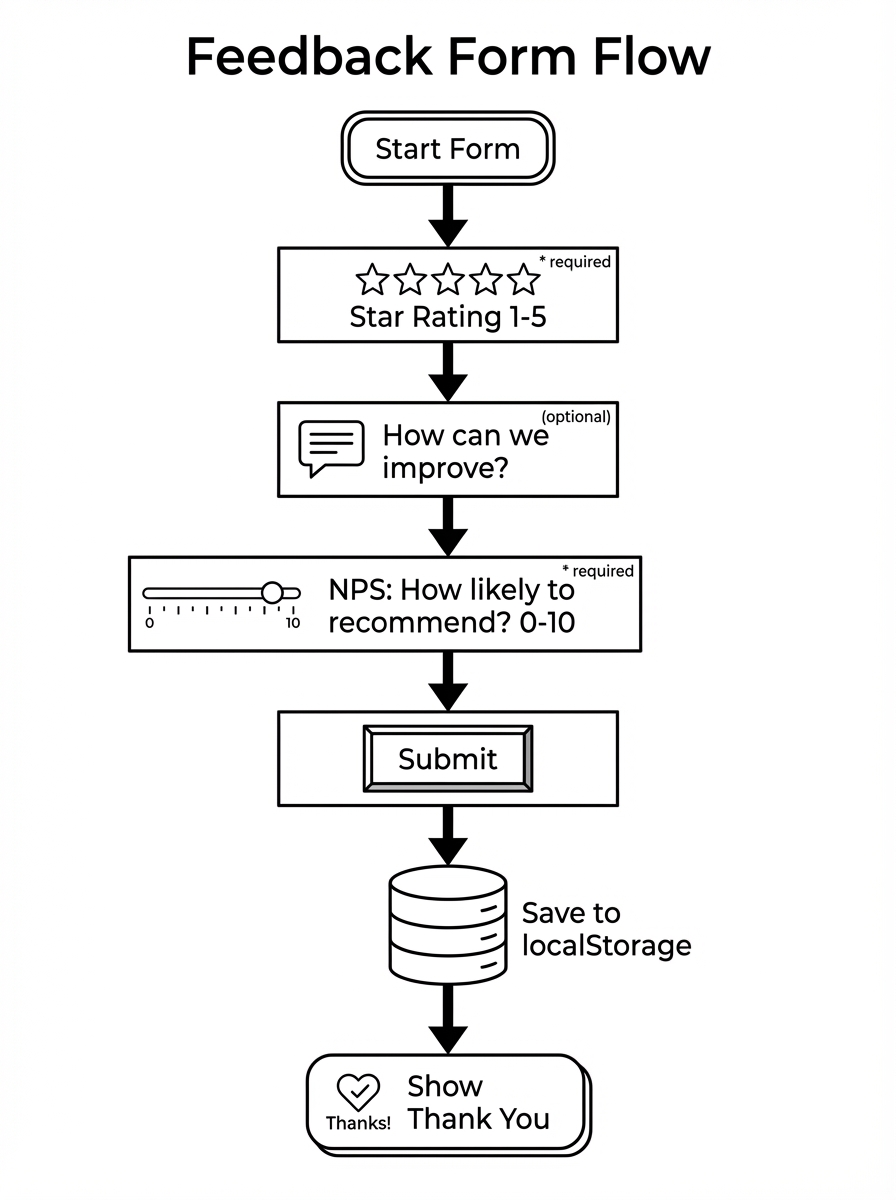
Discussion Points During Execution
Section titled “Discussion Points During Execution”Star ratings UX
Star ratings seem simple but have nuances:
- Should clicking star 3 select stars 1-3, or just star 3?
- How do you handle half stars?
- What’s the hover state?
We’ll implement the most common pattern: clicking star 3 fills stars 1-3, hover preview shows what would be selected.
NPS (Net Promoter Score)
NPS asks: “How likely are you to recommend us to a friend or colleague?” on a 0-10 scale.
- Promoters (9-10) - Loyal enthusiasts
- Passives (7-8) - Satisfied but unenthusiastic
- Detractors (0-6) - Unhappy customers
NPS = % Promoters - % Detractors
It’s a controversial metric (critics say it’s oversimplified) but widely used because it’s easy to benchmark.
Text area sizing
Long text inputs should grow with content up to a maximum height, then scroll. This prevents the jarring experience of a tiny box that scrolls immediately.
What’s Next
Section titled “What’s Next”Coming Up in Week 3: Project Management Tool
Section titled “Coming Up in Week 3: Project Management Tool”We’ll build a Monday.com-style project board, introducing:
- Supabase - PostgreSQL database with real-time subscriptions
- Drag and drop - React DnD for kanban boards
- Multiple users - Shared project state
The GrowthForms data model translates well to a database - we’ll migrate the localStorage approach to Supabase.
Week 4: CRM - The Finale
Section titled “Week 4: CRM - The Finale”The capstone build: a HubSpot-style CRM with:
- Authentication - User accounts and sessions
- Contacts and deals - Full CRUD operations
- Pipeline views - Visual deal progression
- Search - Full-text search across records
Four weeks, four tools. Each one builds on the previous.
Resources
Section titled “Resources”Project Board
Section titled “Project Board”Track progress through each cycle on the Kanban board:
Columns: Specify → Plan → Tasks → Implement → Validate → Done
Issues and User Stories
Section titled “Issues and User Stories”| Cycle | Issue | Description |
|---|---|---|
| PRD | #1 | Product Requirements Document |
| 1 | #2 | Infrastructure Setup |
| 2 | #3 | Navigation System |
| 3 | #4 | Customer Details Form |
| 4 | #5 | Feedback Form |
Code Repository
Section titled “Code Repository”We’ll create this repo live during the workshop. The finished code will be pushed to:
github.com/highlandhodl/growthforms (created during stream)
Recording
Section titled “Recording”The recording will be posted here after the livestream.
Can’t Make It Live?
Section titled “Can’t Make It Live?”All streams are recorded and uploaded to YouTube within a few hours. Subscribe to get notified when recordings are available.
Subscribe to @coengineers on YouTube →
The live experience is better though - you can ask questions and see the debugging in real time.