Book 1: Ship
What Is SpecKit?
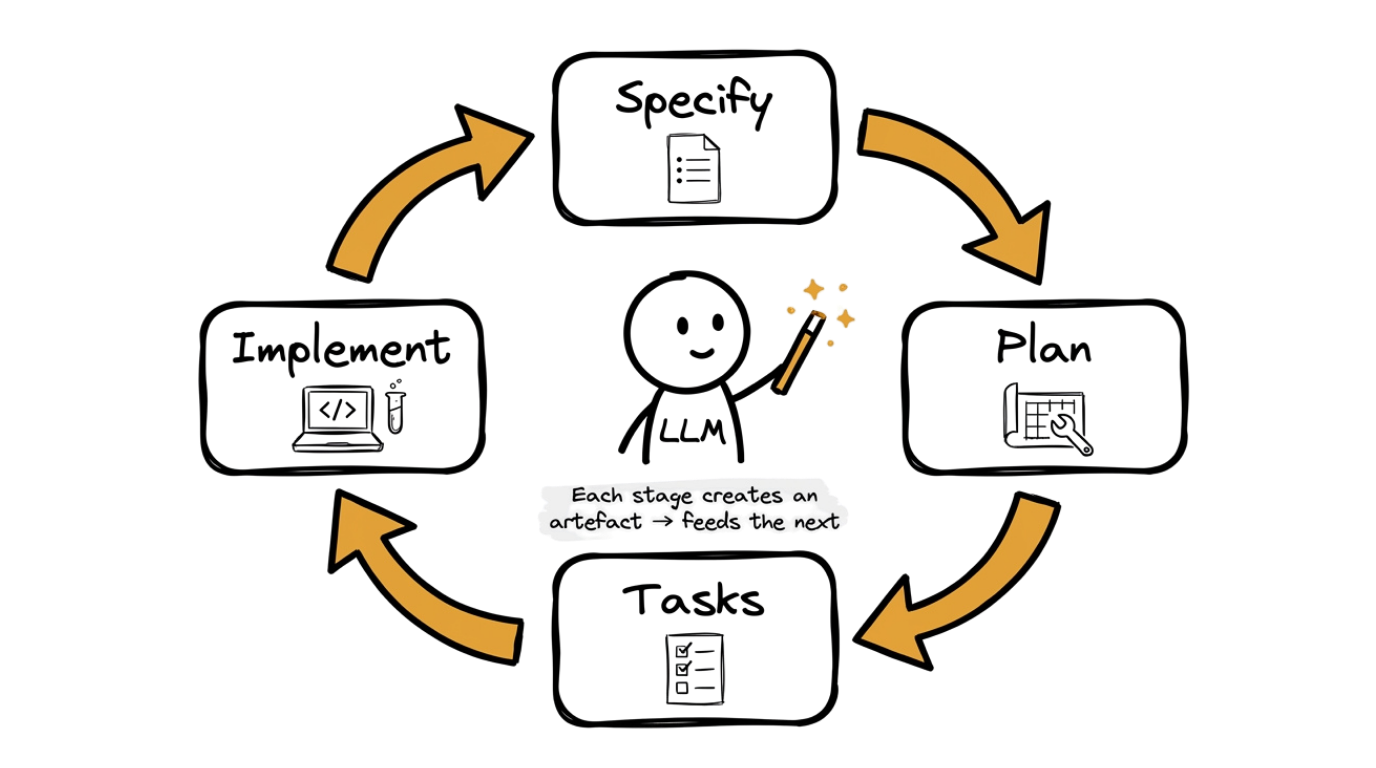
Section titled “What Is SpecKit?”You have a vault full of organised knowledge and a validated offer with paying early adopters. Now you need to build the thing. SpecKit is a specification-driven development workflow that turns product descriptions into working code through a repeatable four-stage cycle: Specify, Plan, Tasks, Implement.
Each stage produces a concrete artefact that feeds into the next, so nothing gets lost in translation between what you imagined and what gets built.
SpecKit is an open-source CLI and skill set available on GitHub. In this book you will use it with Claude Code, but the methodology works with any LLM coding assistant.
The SpecKit Cycle
Section titled “The SpecKit Cycle”- Specify (
/speckit.specify). Describe what you want built in plain language. Claude Code generates a structured specification with an overview, user stories, requirements, and acceptance criteria. - Plan (
/speckit.plan). Claude Code reads the specification and produces a technical blueprint: which files need to be created or changed, the implementation order, and any risks or dependencies. - Tasks (
/speckit.tasks). The plan is broken into a flat, ordered list of discrete tasks. Each task is small enough to implement and verify independently. - Implement (
/speckit.implement). Claude Code works through the task list one task at a time, writing code, running tests, and moving on.
SpecKit also provides optional commands for when you need them: /speckit.clarify asks targeted questions to fill gaps in your spec, /speckit.analyze validates consistency across your spec, plan, and tasks, and /speckit.checklist generates a custom verification checklist for your feature.
The four stages form a loop. After implementing a feature, you may discover that the spec needs updating, or that the plan should change for the next feature. This is expected. The spec is always the source of truth — when reality diverges from the spec, update the spec first, then cascade the change through plan and tasks.
The Constraint of the Sold
Section titled “The Constraint of the Sold”In the Offer page, you found 10 early adopters. They paid. They are waiting. The offer PDF you shared with them is your build constraint now.
You can only build what the offer promised. Not more. Not less. Without this constraint, you would spend three weeks adding features nobody asked for. With the constraint, you build what people paid for, and you ship it to them.
Setting Up SpecKit
Section titled “Setting Up SpecKit”Before starting the SpecKit cycle, you need to install the CLI and initialise your project. Follow the SpecKit Setup guide for step-by-step installation instructions, then come back here to continue.
Step 0: Clone the Repository
Section titled “Step 0: Clone the Repository”The complete Sleep Tracker starter project is available on GitHub.
git clone https://github.com/coengineers/odd-sleep-tracker-mob-app.git ~/Documents/odd-sleep-tracker-mob-appStep 1: Open the Project in Claude Code
Section titled “Step 1: Open the Project in Claude Code”Navigate into the project folder and start Claude Code:
cd ~/Documents/odd-sleep-tracker-mob-appclaudeClaude Code will automatically detect the CLAUDE.md file in the repository and load the project context. From this point on, all prompts in this guide should be entered inside Claude Code.
Reading project structure...

odd-sleep-tracker-mob-app/
├── android/ # Android platform files
├── ios/ # iOS platform files
├── lib/
│ ├── main.dart # App entry point
│ ├── models/
│ │ └── sleep_entry.dart
│ ├── screens/
│ │ ├── home_screen.dart
│ │ ├── history_screen.dart
│ │ └── insights_screen.dart
│ ├── widgets/
│ │ ├── sleep_log_form.dart
│ │ └── sleep_chart.dart
│ ├── providers/
│ │ └── sleep_provider.dart
│ └── database/
│ └── sleep_database.dart
├── test/ # Unit and widget tests
├── pubspec.yaml # Flutter dependencies
├── README.md # Setup instructions
└── CLAUDE.md # Project context for Claude Code

The project uses Flutter with Riverpod for state management and
SQLite for local data storage. All expected files are present.

Key files to know:

- lib/main.dart: the app entry point and navigation setup
- lib/screens/: the four main screens (Home, History, Insights,
and the Log Entry form)
- lib/database/sleep_database.dart: SQLite database for storing
sleep entries locally
- CLAUDE.md: project context that Claude Code reads automatically
LLM outputs are non-deterministic and may vary from this example.
Step 2: Follow the README Setup Instructions
Section titled “Step 2: Follow the README Setup Instructions”Open the README.md file in the repository and read through the setup instructions. These cover installing Flutter, setting up an emulator, and installing dependencies.
I have read the README. Let me walk you through each setup step.

1. Flutter SDK
 Checking if Flutter is installed... not found.

 Install Flutter:
 - Download from https://docs.flutter.dev/get-started/install
 - Extract to your preferred location
 - Add Flutter to your PATH:
   export PATH="$HOME/development/flutter/bin:$PATH"
 - Run: flutter doctor

 flutter doctor output:
 [✓] Flutter (Channel stable, 3.27.4)
 [✓] Android toolchain
 [✓] Xcode - develop for iOS and macOS
 [✓] Chrome - develop for the web
 [✓] Android Studio
 [✓] VS Code
 [✓] Connected device (2 available)
 [✓] Network resources

 All checks passed.

2. Dependencies
 Running: flutter pub get
 Resolving dependencies...
 Got dependencies. 47 packages installed.

3. Android Emulator
 Checking for available emulators...
 Found: Pixel_7_API_34

 If you do not have an emulator, create one:
 - Open Android Studio > Tools > Device Manager
 - Click "Create Device"
 - Select Pixel 7, then download and select API 34
 - Click Finish

4. Start the emulator
 Running: flutter emulators --launch Pixel_7_API_34
 Emulator launched successfully.

All dependencies are installed and your development environment
is ready. Run "flutter run" to launch the app on the emulator.
LLM outputs are non-deterministic and may vary from this example.
Step 3: Get the App Running
Section titled “Step 3: Get the App Running”Running: flutter run Launching lib/main.dart on Pixel 7 API 34 in debug mode... Running Gradle task 'assembleDebug'... ✓ Built build/app/outputs/flutter-apk/app-debug.apk. Installing and launching on Pixel 7 API 34... App launched successfully. Here is what you should see: Home Screen (default tab): - A large "Log Sleep" button in the centre - Today's date displayed at the top - A placeholder message: "No sleep logged for today" - The current time shown as a reference Bottom Navigation Bar (3 tabs): - Home (house icon): the current screen - History (clock icon): shows past sleep entries - Insights (chart icon): shows sleep patterns and stats Tap the "Log Sleep" button: - A form appears with fields for: - Bedtime (time picker, defaults to last night) - Wake time (time picker, defaults to this morning) - Sleep quality (1-5 star rating) - Notes (optional text field) - "Save" button at the bottom Tap "History" in the bottom bar: - Shows a list of past sleep entries (empty on first run) - Each entry shows date, duration, and quality rating Tap "Insights" in the bottom bar: - Shows average sleep duration, average quality, and a 7-day bar chart - All values will be zero until you log some entries Verify these three things before moving on: 1. The app launches without errors ✓ 2. All three tabs are tappable and switch screens ✓ 3. The "Log Sleep" button opens the form ✓
LLM outputs are non-deterministic and may vary from this example.
Before moving on, confirm these three things:
- The app launches without crash screens or error messages in your terminal.
- Navigation works by tapping each tab in the bottom bar.
- The core interaction responds: tap the sleep log button and confirm the form opens.
If any of these checks fail, copy the error message from your terminal and paste it into Claude Code.
Building with the SpecKit Cycle
Section titled “Building with the SpecKit Cycle”The starter project gives you a working Sleep Tracker with the core features your offer promised: logging sleep, viewing history, and seeing insights. Now you will use the full SpecKit cycle to add a new feature — the Sleep Goal — which lets users set a target sleep duration and track their progress against it.
This is where SpecKit earns its keep. Instead of jumping into code and hoping for the best, you will work through each stage methodically: specify what you want, plan how to build it, break it into tasks, implement, and verify.
Step 4: Establish the Constitution
Section titled “Step 4: Establish the Constitution”Before building any features, define your project’s constitution. The constitution captures the principles and development guidelines that every specification, plan, and implementation should follow. You do this once per project, not per feature.
Activating speckit.constitution skill...

Reading project context...
Reading: CLAUDE.md

Generating project constitution...

Constitution saved to: .specify/memory/constitution.md

═══════════════════════════════════════════════════
PROJECT CONSTITUTION: Sleep Tracker
═══════════════════════════════════════════════════

Principles

1. Simplicity over features. Every screen should do one thing
 well. If a feature cannot be explained in one sentence, it is
 too complex. The Sleep Tracker is deliberately minimal — that
 is its strength, not a limitation.

2. Local-first, always. All data stays on the device. No cloud
 accounts, no sign-up flows, no server dependencies. The user
 owns their data completely. SQLite is the single source of
 truth.

3. Accessible by default. Clear visual hierarchy, sufficient
 colour contrast, readable font sizes, and meaningful labels
 on all interactive elements. The app should be usable without
 perfect vision.

4. British English everywhere. All user-facing copy uses British
 English spelling and conventions: colour, behaviour, organise,
 programme (where appropriate).

5. Constraint of the sold. Only build what the offer promised.
 No scope creep. Features must trace back to the offer PDF
 shared with early adopters.

Development Guidelines

- State management: Riverpod providers only. No setState calls
outside of local widget state.
- Database: All persistence through sleep_database.dart. No
direct SQLite calls from screens or widgets.
- Testing: Every new feature must include at least one unit test
and one widget test. Existing tests must not break.
- File structure: Follow the existing convention —
screens/, widgets/, models/, providers/, database/.

═══════════════════════════════════════════════════

The constitution is now stored in .specify/memory/
and will be referenced by all subsequent SpecKit
commands.

═══════════════════════════════════════════════════
LLM outputs are non-deterministic and may vary from this example.
Review the constitution. It should reflect the non-negotiable standards for the Sleep Tracker. Every specification and plan that SpecKit generates will be guided by these principles, so get them right once and they will pay off across every feature you build.
Step 5: Write the Specification
Section titled “Step 5: Write the Specification”Your vault already contains the product requirements document at 03_build/app_prd.md — you completed it during the Vault guide. Your PRD lists several features. Do not try to build them all at once. Pick one feature for your first SpecKit cycle. You will repeat the full cycle (Specify → Plan → Tasks → Implement → Verify) for each remaining feature afterwards.
For this walkthrough, we will use the Sleep Goal feature. Point SpecKit at your PRD and tell it which feature to specify.
Activating speckit.specify skill...

Reading: CLAUDE.md
Reading: .specify/memory/constitution.md

Generating structured specification...

Specification saved to: .specify/specs/sleep-goal/spec.md

═══════════════════════════════════════════════════
FEATURE SPECIFICATION: Sleep Goal & Progress
═══════════════════════════════════════════════════

Overview

Add a Sleep Goal feature that lets users set a target sleep
duration and track their progress against it across all screens.
The goal is stored as a user preference (no schema migration
required). A new Settings screen is accessible from the bottom
navigation bar.

User Stories

1. As a user, I want to set a target sleep duration so I know
 what I am aiming for each night.
2. As a user, I want to see a progress bar on the Home screen
 so I can instantly see how last night compared to my goal.
3. As a user, I want a visual indicator on each History entry
 so I can see which nights I met my goal at a glance.
4. As a user, I want to see my goal achievement rate on the
 Insights screen so I can track consistency over time.

Requirements

Settings Screen:

- Add a "Sleep Goal" option to a new Settings screen
- Accessible from a fourth tab in the bottom navigation bar
(gear icon)
- User can set a target duration in hours and minutes
(default: 8h 0m)
- Minimum: 4 hours. Maximum: 12 hours. Step: 15 minutes.
- Persist the goal using SharedPreferences

Home Screen:

- Display a progress bar below the date header
- Progress = (last night's duration / goal duration) x 100%
- Colour coding: red (<75%), amber (75-99%), green (>=100%)
- Show "No goal set" message if the user has not configured
a goal yet

History Screen:

- Add a small badge (tick or cross icon) to each entry row
- Tick (green) if sleep duration >= goal duration
- Cross (red) if sleep duration < goal duration
- No badge shown if no goal is set

Insights Screen:

- Add a new metric card: "Goal Achievement"
- Display: "X/30 nights met target in last 30 days"
- Show "Set a sleep goal in Settings to track achievement"
if no goal is configured

Acceptance Criteria

- [ ] Settings screen exists and is accessible from the bottom
    navigation bar as a fourth tab
- [ ] Sleep goal can be set between 4h and 12h in 15-min steps
- [ ] Goal persists across app restarts
- [ ] Home screen progress bar reflects last night vs goal
- [ ] Progress bar uses correct colour coding (red/amber/green)
- [ ] History entries show tick or cross badge
- [ ] Insights screen shows X/30 goal achievement metric
- [ ] All screens handle the "no goal set" state gracefully
- [ ] All screens handle the "no data" state gracefully
- [ ] Existing tests still pass after implementation

Out of Scope

- Cloud sync for goal settings
- Multiple goals or goal scheduling by day of week
- Notifications or reminders related to the goal
- Goal history or goal change tracking

═══════════════════════════════════════════════════

Review the specification against your offer PDF. Every
requirement should trace back to something you promised
your early adopters. If it does not, remove it.
LLM outputs are non-deterministic and may vary from this example.
Review the specification against your offer PDF. Every requirement should trace back to something you promised your early adopters. If a requirement does not appear in the offer, remove it. If something from the offer is missing, add it. The spec is your contract with your customers.
If your spec has ambiguous areas, run /speckit.clarify — it asks targeted questions and encodes the answers back into the spec before planning begins.
Step 6: Generate the Plan
Section titled “Step 6: Generate the Plan”With a reviewed specification in place, generate a technical implementation plan. This is where architectural decisions get made before any code is written.
Activating speckit.plan skill...

Reading: .specify/specs/sleep-goal/spec.md
Reading: .specify/memory/constitution.md

Generating technical implementation plan...

Plan saved to: .specify/specs/sleep-goal/plan.md

═══════════════════════════════════════════════════
IMPLEMENTATION PLAN: Sleep Goal & Progress
═══════════════════════════════════════════════════

Files to Create

- lib/screens/settings_screen.dart
New Settings screen with a sleep goal duration picker.
Uses a CupertinoPicker or custom slider for hours/minutes
selection in 15-minute increments.

- lib/providers/sleep_goal_provider.dart
Riverpod provider that reads/writes the sleep goal from
SharedPreferences. Exposes the current goal duration and
a method to update it.

- lib/widgets/goal_progress_bar.dart
Reusable progress bar widget with colour coding:
red (<75%), amber (75-99%), green (>=100%).

- lib/widgets/goal_badge.dart
Small tick/cross icon widget used in History list items.

- test/sleep_goal_test.dart
Unit tests for goal provider logic (default value, min/max
bounds, persistence).

- test/goal_progress_bar_test.dart
Widget tests for progress bar colour coding thresholds.

Files to Modify

- lib/main.dart
Add Settings tab to the bottom navigation bar (fourth tab,
gear icon). Update the page list and navigation index.

- lib/screens/home_screen.dart
Add GoalProgressBar widget below the date header. Read the
goal from sleep_goal_provider and last night's duration from
sleep_provider.

- lib/screens/history_screen.dart
Add GoalBadge widget to each list item. Compare each entry's
duration against the goal from sleep_goal_provider.

- lib/screens/insights_screen.dart
Add a "Goal Achievement" metric card. Query the last 30 days
of entries and count how many met the goal.

- pubspec.yaml
Add shared_preferences dependency (if not already present).

Implementation Order

1. Add shared_preferences dependency to pubspec.yaml
2. Create sleep_goal_provider.dart (foundation — other files
 depend on reading the goal)
3. Create settings_screen.dart (UI for setting the goal)
4. Update main.dart to add Settings tab to navigation
5. Create goal_progress_bar.dart widget
6. Update home_screen.dart to show the progress bar
7. Create goal_badge.dart widget
8. Update history_screen.dart to show badges on entries
9. Update insights_screen.dart with goal achievement metric
10. Write unit and widget tests

Dependencies

- shared_preferences: ^2.2.0 (for persisting the goal value)
- No other new dependencies required

Risks and Mitigations

1. Risk: Adding a fourth tab changes the navigation layout,
 which could break existing screen transitions.
 Mitigation: Update the navigation index mapping carefully
 and test all four tabs after the change.

2. Risk: SharedPreferences reads are asynchronous, which could
 cause a flash of "no goal set" on app launch.
 Mitigation: Use an AsyncValue in Riverpod and show a loading
 state until the goal is read.

═══════════════════════════════════════════════════

Review the plan. This is the cheapest place to catch
architectural problems — changing a plan costs nothing,
changing code costs time.
LLM outputs are non-deterministic and may vary from this example.
This is the cheapest place to catch architectural problems. Changing a plan document costs nothing. Changing code after it has been written costs time and introduces risk. Read through the plan and check that the implementation order makes sense, the file structure follows the existing conventions, and no unnecessary dependencies have been introduced.
Step 7: Break into Tasks
Section titled “Step 7: Break into Tasks”The plan describes what needs to happen. Now break it into a flat, ordered list of discrete tasks. Each task should be small enough to implement and verify independently.
Activating speckit.tasks skill...

Reading: .specify/specs/sleep-goal/spec.md
Reading: .specify/specs/sleep-goal/plan.md

Generating ordered task list...

Task list saved to: .specify/specs/sleep-goal/tasks.md

═══════════════════════════════════════════════════
TASK LIST: Sleep Goal & Progress
═══════════════════════════════════════════════════

Task 1: Add shared_preferences dependency
Files: pubspec.yaml
Verify: Run "flutter pub get" and confirm no version conflicts.

Task 2: Create the sleep goal provider
Files: lib/providers/sleep_goal_provider.dart
Verify: Write a unit test that reads the default goal (8h),
sets a new goal (7h 30m), and confirms it persists.

Task 3: Create the Settings screen with goal picker
Files: lib/screens/settings_screen.dart
Verify: Hot reload and confirm the screen renders with a
duration picker defaulting to 8h 0m. Change the value and
confirm the provider updates.

Task 4: Add Settings tab to bottom navigation
Files: lib/main.dart
Verify: Hot reload and confirm four tabs appear (Home, History,
Insights, Settings). Tap each tab and confirm all four screens
load correctly.

Task 5: Create the goal progress bar widget
Files: lib/widgets/goal_progress_bar.dart
Verify: Write a widget test confirming red below 75%, amber at
75-99%, and green at 100% or above.

Task 6: Add progress bar to the Home screen
Files: lib/screens/home_screen.dart
Verify: Log a sleep entry, set a goal, and confirm the progress
bar appears on the Home screen with the correct colour.

Task 7: Create the goal badge widget
Files: lib/widgets/goal_badge.dart
Verify: Write a widget test confirming a green tick when
duration >= goal and a red cross when duration < goal.

Task 8: Add goal badges to the History screen
Files: lib/screens/history_screen.dart
Verify: Log several entries with different durations. Confirm
ticks appear on entries that meet the goal and crosses on those
that do not.

Task 9: Add goal achievement metric to the Insights screen
Files: lib/screens/insights_screen.dart
Verify: Log entries across multiple days. Confirm the "Goal
achievement: X/30 nights met target" metric appears and updates
correctly.

Task 10: Write remaining unit and widget tests
Files: test/sleep_goal_test.dart, test/goal_progress_bar_test.dart
Verify: Run "flutter test" and confirm all tests pass, including
existing tests.

═══════════════════════════════════════════════════

Review the task order. Each task should build on the
previous one without breaking the project at any point.
LLM outputs are non-deterministic and may vary from this example.
After generating tasks, you can optionally run /speckit.analyze to validate consistency across your spec, plan, and tasks. It flags contradictions or gaps without modifying any files.
Review the task granularity. If a task touches more than three files or would take more than 15 minutes to verify, it is probably too large — ask Claude Code to split it. If two tasks always need to happen together, they should be one task.
Step 8: Implement
Section titled “Step 8: Implement”Now ask Claude Code to work through the task list in order. The key discipline here is sequential execution: complete one task, verify it works, then move to the next.
Activating speckit.implement skill...

Reading: .specify/specs/sleep-goal/tasks.md

Starting implementation...

───────────────────────────────────────────────────
Task 1: Add shared_preferences dependency
───────────────────────────────────────────────────

Modifying: pubspec.yaml
Added: shared_preferences: ^2.2.0

Running: flutter pub get
Resolving dependencies... Got dependencies.

Verification: No version conflicts detected.
Result: PASS ✓

───────────────────────────────────────────────────
Task 2: Create the sleep goal provider
───────────────────────────────────────────────────

Creating: lib/providers/sleep_goal_provider.dart

- SleepGoalNotifier extends StateNotifier<AsyncValue<Duration>>
- Default goal: 8 hours
- Min: 4 hours, Max: 12 hours, Step: 15 minutes
- Reads from and writes to SharedPreferences

Writing: test/sleep_goal_test.dart

- Tests default value (8h)
- Tests setting a new goal (7h 30m)
- Tests min/max boundary enforcement

Running: flutter test test/sleep_goal_test.dart
3 tests passed.

Verification: Provider reads, writes, and validates correctly.
Result: PASS ✓

───────────────────────────────────────────────────
Task 3: Create the Settings screen with goal picker
───────────────────────────────────────────────────

Creating: lib/screens/settings_screen.dart

- Duration picker with hours (4-12) and minutes (0, 15, 30, 45)
- Displays current goal at top of screen
- "Save" button writes to provider

Verification: Screen renders, picker defaults to 8h 0m,
changes persist to provider.
Result: PASS ✓

───────────────────────────────────────────────────
Task 4: Add Settings tab to bottom navigation
───────────────────────────────────────────────────

Modifying: lib/main.dart

- Added fourth BottomNavigationBarItem (gear icon, "Settings")
- Updated page list to include SettingsScreen
- Updated index handling for 4 tabs

Verification: All four tabs render and navigate correctly.
Result: PASS ✓

───────────────────────────────────────────────────
Task 5: Create the goal progress bar widget
───────────────────────────────────────────────────

Creating: lib/widgets/goal_progress_bar.dart

- GoalProgressBar(progress: double) widget
- Red fill when progress < 0.75
- Amber fill when 0.75 <= progress < 1.0
- Green fill when progress >= 1.0

Writing: test/goal_progress_bar_test.dart

- Tests colour at 50% (red)
- Tests colour at 80% (amber)
- Tests colour at 100% (green)
- Tests colour at 110% (green, clamped display)

Running: flutter test test/goal_progress_bar_test.dart
4 tests passed.

Verification: Widget renders with correct colours at all thresholds.
Result: PASS ✓

───────────────────────────────────────────────────
Task 6: Add progress bar to the Home screen
───────────────────────────────────────────────────

Modifying: lib/screens/home_screen.dart

- Reads goal from sleep_goal_provider
- Reads last night's duration from sleep_provider
- Shows GoalProgressBar below the date header
- Shows "No goal set" message when goal is not configured

Verification: Progress bar appears and reflects last night vs goal.
Result: PASS ✓

───────────────────────────────────────────────────
Task 7: Create the goal badge widget
───────────────────────────────────────────────────

Creating: lib/widgets/goal_badge.dart

- GoalBadge(met: bool) widget
- Green tick icon when met is true
- Red cross icon when met is false
- Hidden when no goal is set (met is null)

Verification: Badge renders correctly for both states.
Result: PASS ✓

───────────────────────────────────────────────────
Task 8: Add goal badges to the History screen
───────────────────────────────────────────────────

Modifying: lib/screens/history_screen.dart

- Reads goal from sleep_goal_provider
- Adds GoalBadge to each SleepEntry list tile
- Compares entry duration against goal to determine badge state

Verification: Entries show ticks and crosses correctly.
Result: PASS ✓

───────────────────────────────────────────────────
Task 9: Add goal achievement metric to the Insights screen
───────────────────────────────────────────────────

Modifying: lib/screens/insights_screen.dart

- Reads goal from sleep_goal_provider
- Queries last 30 days of entries from sleep_provider
- Counts entries where duration >= goal
- Displays "Goal achievement: X/30 nights met target"
- Shows prompt to set a goal if none is configured

Verification: Metric appears and updates with correct count.
Result: PASS ✓

───────────────────────────────────────────────────
Task 10: Write remaining unit and widget tests
───────────────────────────────────────────────────

Updating: test/sleep_goal_test.dart

- Added persistence test (write, reload, confirm value)
- Added boundary tests (setting below 4h, above 12h)

Running: flutter test
23 tests passed, 0 failed.

Verification: All tests pass, including existing tests.
Result: PASS ✓

═══════════════════════════════════════════════════
IMPLEMENTATION COMPLETE

Tasks completed: 10/10
Tests passing: 23/23
Build status: clean

═══════════════════════════════════════════════════
LLM outputs are non-deterministic and may vary from this example.
If a task fails, do not skip it and move on. The sequential order exists for a reason — later tasks depend on earlier ones. Fix the failure, verify the fix, then continue. If you cannot fix it, go back to the spec or plan and check whether the approach needs changing.
Step 9: Verify the Feature
Section titled “Step 9: Verify the Feature”Once all tasks are complete, run a final check against the acceptance criteria from your specification. This confirms that what was built matches what was specified.
Reading: .specify/specs/sleep-goal/spec.md

Verifying acceptance criteria against the Sleep Tracker
implementation...

═══════════════════════════════════════════════════
VERIFICATION REPORT: Sleep Goal & Progress
═══════════════════════════════════════════════════

- [x] PASS: Settings screen exists and is accessible from the
    bottom navigation bar as a fourth tab
    Evidence: SettingsScreen renders at index 3 in main.dart.
    Gear icon and "Settings" label visible.

- [x] PASS: Sleep goal can be set between 4h and 12h in 15-min
    steps
    Evidence: Picker enforces min 4h, max 12h, 15-min steps.
    Boundary tests pass.

- [x] PASS: Goal persists across app restarts
    Evidence: SharedPreferences write/read test passes.
    Value survives hot restart.

- [x] PASS: Home screen progress bar reflects last night vs goal
    Evidence: Logged 6h with 8h goal, progress bar shows 75%.

- [x] PASS: Progress bar uses correct colour coding
    Evidence: Widget tests confirm red (<75%), amber (75-99%),
    green (>=100%).

- [x] PASS: History entries show tick or cross badge
    Evidence: Entry with 9h shows green tick (goal 8h). Entry
    with 5h shows red cross.

- [x] PASS: Insights screen shows X/30 goal achievement metric
    Evidence: With 3 entries meeting goal out of 5 total,
    displays "Goal achievement: 3/30 nights met target."

- [x] PASS: All screens handle the "no goal set" state gracefully
    Evidence: Home shows "No goal set", History hides badges,
    Insights shows "Set a sleep goal in Settings."

- [x] PASS: All screens handle the "no data" state gracefully
    Evidence: With no entries logged, all screens display
    appropriate empty states without errors.

- [x] PASS: Existing tests still pass after implementation
    Evidence: flutter test — 23 tests, 23 passed, 0 failed.

═══════════════════════════════════════════════════

Result: 10/10 criteria passed.

The Sleep Goal feature is complete and verified against the
specification. All acceptance criteria are met.

═══════════════════════════════════════════════════
LLM outputs are non-deterministic and may vary from this example.
If any criterion fails, you have two options: fix the implementation to match the spec, or update the spec if the criterion was wrong. Either way, the spec and the code must agree before you move on.
Running the Cycle Again
Section titled “Running the Cycle Again”The SpecKit cycle is not a one-time process. Each feature in the Sleep Tracker gets its own cycle: Specify, Plan, Tasks, Implement, Verify.
You have just built the Sleep Goal feature. If your offer promised other features — or if early adopter feedback reveals something worth adding — start a new specification. Each iteration gets faster because Claude Code learns the project structure, your conventions become clearer, and you get better at writing specifications that leave less room for ambiguity.
The spec is always the source of truth. When you finish a feature, commit the spec, plan, and task list alongside the code. They are documentation that explains not just what was built, but why it was built that way.
Delivering to Your Early Adopters
Section titled “Delivering to Your Early Adopters”The app is built. Now put it in the hands of the people who paid for it.
Your 10 early adopters from the Offer page are waiting. Share a development build (APK for Android, TestFlight for iOS). Send it to each early adopter with a short message: “Here is the Sleep Tracker you signed up for. I would love to hear what you think.”
Run lightweight UAT. Ask each person to do three things: log one night of sleep, check the history screen, and look at the insights dashboard. If they can do all three without asking you a question, the core experience works.
Collect feedback simply. A shared note, a WhatsApp group, or a reply to your message. Close the loop: when you fix something based on their feedback, tell them. Early adopters who feel heard become advocates.
What Comes Next
Section titled “What Comes Next”You have taken a starter project, set up a development environment, and built a real feature using the SpecKit workflow with Claude Code. The Sleep Tracker is yours to keep building.
Head to the Scale page to learn how to grow beyond your first 10 early adopters with outreach, content, and the Core Four framework.